Table of Contents
The Importance of Mountain Bike Maintenance
When owning a Mountain bike these days; especially a high-end mountain bike variant as is most commonly used these days, it isn’t a farce that your bike could have set you back a similar amount if not more than your car!
Now, when it comes to your motor vehicle, you wouldn’t dare miss a servicing date for risk that the car- comprising of thousands of little parts- could start to break down and your well-oiled machine could be reduced to a smoking pile of metal.
So, the question that begs is that if both your 4-wheeled steed and your 2-pedalled pony cost the same amount of money and both comprise of technical driveline, suspension and braking systems – why should you treat your bike any differently in terms of regular servicing, upkeep maintenance? Well, you shouldn’t.
How Often Should You Service Your Bike
As I mentioned, mountain bikes require regular maintenance and checking. As a general rule of thumb, mountain bike maintenance should start as soon as you return from a ride.
There are things you should check and do immediately after riding, before your next ride, and then more long-term/periodically as needed, for the parts with a finite existence. We broke them down categorically, so you are never caught trailside with a faulty bike again.
Our 6 Basic Pre-Ride Mountain Bike Maintenance Tips
Check Your Brakes
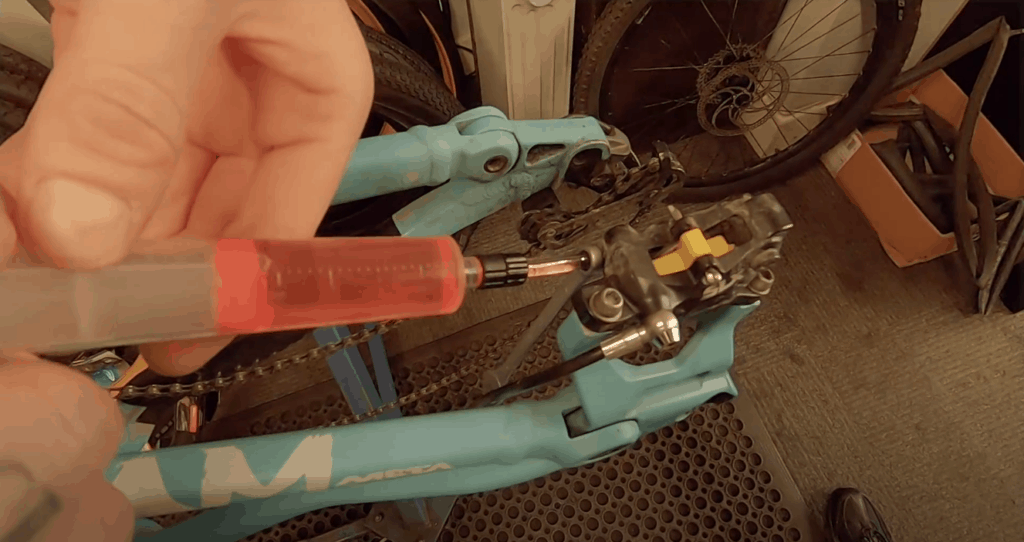
You seriously don’t want to wait until you’re going at any significant speed on a trail to test your brakes. First, check that you don’t have any bubbles in your reservoir or tubes.
Squeeze the brakes a few times and go for a quick ride down the road to make sure they’re in order. If they feel loose, check there isn’t a leak in any of the lines. Keep pumping the brakes and turn your bike upside down, and if the problem persists it’s time to bleed the system.
You also need to check your pads. Due to the nature of mountain biking, the brake pads constant exposure to moisture, mud and grit reduces their lifespan. To check them, you may have to take off your wheels. If the pads themselves have significant striations, wearing or are thinner than a dime, it’s time to replace them.
If they get that thin it’s probably a good idea to check the discs themselves for damage. Always remember that the brakes should wear at an equal rate, and if there are discrepancies in the amount of wear, it means your brakes weren’t correctly aligned to begin with.
If you need an on-the-fly brake adjustment, you can tighten them up using the barrel adjuster, but generally if your brakes feel solid, you’re good to go.
Check Your Tire Pressure
Next up, it is important to check on the condition and inflation of your tires. First, check both the tread and condition of the tires. Check there is enough tread, and no visible flaps or burrs in the rubber, as well as any thorns that could embed in the tire and cause a flat.
In terms of pressure, the ideal pressure for you depends on multiple factors such as the tire compound in question, your weight, where you’ll be riding and what the weather is like.
Just remember, more pressure generally means less traction, especially in wet weather. We’d advise investing in a cheap tire pressure gauge, or a floor pump with a built-in one.
Check Your Gears for Shifting
While out on that short ride down the road to check your brakes, you should definitely check your bike’s gear shifting too. As I said, this can simply be done out on a ride or alternatively on a bike stand. Cycle through all the gears, checking both the front and rear shifters are working smoothly.
If not, you should check that your wheels are seated properly in the skewers or thru-axles. If it is still getting stuck or hesitating/lagging, there are a few things you can do. Firstly, you may need to tighten or loosen the barrel adjuster that exits from the rear derailleur, which will either tighten or loosen tension in the shifter cable.
Remember that bent, dirty or rusted cables can lead to poor shifting. The next consideration I mentioned, is checking the chain. Make sure it passes through the chainring and cassette smoothly without skipping, and make sure to generously lube each link.
Many issues relating to the drivetrain are a result of the fact that let’s face it, the drivetrain takes the most abuse out of the entire bike. All the components turn and are mud, water and debris magnets.
So, to avoid issues and early wear, clean your cassette, chain and chainring with a toothbrush and some degreaser. Just make sure to remember to lube the chain again afterwards!
Check Your Pedals
Riders often tend to forget that the pedals also take much abuse, and can easily get muddy, grimy and clogged up. Flat pedals often hit rocks, roots and the terrain when riding, and clipless pedals can get full of muck.
So; before riding, give them a quick inspection, wipe down/clean and make sure your feet can get in and out of the pedals, before realizing too late you’re stuck in them!
Check All Bolts and Screws
When it comes to this stage of the pre-ride inspection, we’d caution you to use common sense, as well as extreme caution and accuracy.
In a previous article, we spoke about the best bike torque wrenches on the market, and we’d highly advise that for this job you have one of those handy, because without it you run the risk of inaccurately checking bolts and possibly overtightening, which could lead to a whole different headache.
Before you touch anything, do a skim over the bike and firstly establish that you do in fact have all your bolts and screws, and none have fallen out while riding. If you do, then it is always recommended that you check the tightness of each and every bolt and screw, however don’t be tempted to tighten each one or you may run the risk of overtightening.
As I said, we’d recommend using a torque wrench, and making sure each bolt is to the manufacturers recommended specs. (NB: take extra care with smaller bolts, or bolts on carbon fibre parts, as it would be tragic and expensive to overtighten and damage these.)
Check Your Wheels Are Secure
Another essential part of mountain bike maintenance is checking that the wheels are secure and straight (true). First, check your rims as well as your spokes to see that they are not bent or damaged.
Next, prop your mountain bike up on a stand, and give the wheels a spin. The tension of the spokes should be normal feeling, and any loose spokes means you should get your wheel tensioned and trued (straightened).
Any out of place or blatant sideways swaying or up and down movement when you spin the wheel is a dead giveaway it needs truing.

After Your Ride
Now that you are 110% sure your bike is ready to ride, the good news is you can go out and enjoy the gifts mother nature has to offer out on the trails!
However, the bad news is that the mountain bike maintenance saga doesn’t end there. There are a number of key things you should tend to post-ride, besides chucking you bike in a muddy heap in your garage! Here is a further 6 things to do after your ride:
Wash Your Bike
Now, the frequency and extent to which you wash your bike depends on factors like how dirty it is after a ride. Unless it is caked in mud, we’d actually suggest not washing it after every ride, because the repetitive exposure to soapy water is a one-way ticket to decreasing the lifespan of your components, or making them rusty.
If it does need a wash, try to do it before the mud cakes and hardens, and also never use a high-pressure washer as this can damage components- soapy water and a cloth should work fine.
Finally, try to use non-abrasive soap, or a mild degreaser, as strong soap can wear away paint and lubricated parts.
Inspect the Whole Bike
Once the impenetrable veil of mud and grime has been washed away and you can actually see your bike again, we’d always recommend doing a thorough sweep and checking its condition post ride too.
Check your drivetrain, brakes and suspension, as well as checking the frame meticulously for cracks and chips (ESPECIALLY if you crashed or have a carbon fibre mountain bike), as any little cracks can spell disaster for you out on your next ride if you fail to pick it up early.
Check Your Tire Pressure
Now that you already checked the tire pressure earlier, you should have a baseline value for how much it was sitting at when you started. Now that you’re back from your ride, check it again to make sure there are has been no dramatic leaks or downward fluctuations.
A significant drop in tire pressure could indicate that you have a puncture or slow leak. As you can imagine, checking it after your ride and ‘nipping the issue in the bud’ can save you having to make a last-minute change, repair or inflation on the next ride.
Oil Your Drive Train
Now that your bike is cleaned, degreased and hopefully dry (if not- give it a quick rub down with a cloth to dry it off), it is time to oil up the drive train to ensure proper functioning next time.
For your chain, add 1-2 drops of the best suited lube for your circumstances to each link. Make sure to be precise and take your time. Less is more, so wipe off the excess as this will only interfere with shifting and attract unnecessary dirt, sand and dust. You can optionally lube pivot joints, as well as your derailleurs; placing a single drop of lube on each hinge, pulley bushing and seal and springs.
Wipe Down Your Forks and Shocks
Your suspension stanchions will seriously benefit from a good wipe-down after riding, and it is a pat of mountain bike maintenance that is frequently overlooked.
Cleaning them simply ensures the reliability and smooth usage of your shocks and forks next time, and makes sure no grime creeps its way into your suspension oil.
These may seem like pedantic measures for a mountain bike, but then again if you remember how expensive the replacing these components will be, you may reconsider being lazy and neglecting them!
Check Fork and Shock Air Pressure
In addition to giving them a clean, every now and then (every several rides or so) we’d recommend checking the manufacturers stipulated air pressure for these components, both the suspension and the fork. If something feels off with the suspension or ride quality, we’d especially recommend you check.
Conclusion
Now you’re done! Remember the age old saying that a stitch in time saves nine, as it is so relevant when it comes to these expensive pieces of equipment! Take proper care of your ride, and it’ll take care of you.

I’m James Duff, a 29-year-old from Orange, California, fueled by a lifelong passion for bikes. From childhood pedaling to exploring BMX tricks and tackling mountain trails, biking has been my constant. Now, I’m translating that love into words on this blog. Join me in discovering the thrilling world of biking, as I share insights, gear essentials, and personal adventures. Let’s journey together through the exhilarating realm of cycling.